iOS developers use two key object oriented frameworks called Foundation and UIKit to do many of the most important programming tasks needed to make apps. Frameworks are collections of code that are shared by programmers that solve common problems. Foundation was built by engineers to solve common computing problems like using strings, managing collections of objects, connecting to the Internet, storing data, writing to the file system and much more. UIKit is the framework that is responsible for all the visual elements that you see on iOS apps like buttons, tables and tab bars.
I want to go over these frameworks with you in this chapter for two reasons. The first is that the best way to start learning object oriented programming is to see how objects are used in code. You need to learn how to instantiate objects from classes, manage memory with objects and how to use objects. Most of modern programming focuses on using code from frameworks like Foundation to develop software.
The NS And UI Prefixes
Let’s take a look at a Hello World example first so we can see where some of these frameworks come into play.
-(BOOL)application:(UIApplication *)application didFinishLaunchingWithOptions:(NSDictionary *)launchOptions {

     UIAlertView *alert = [[UIAlertView alloc] initWithTitle:@"Alert View"
                                                     message:@"Hello World"
                                                    delegate:self
                                           cancelButtonTitle:@"Ok"
                                           otherButtonTitles:nil];
     [alert show];

     [window makeKeyAndVisible];

     return YES;
}
I highlighted the code that I wanted to point out above. UIAlert is the class definition that we used above to instantiate our alert object. UIAlert objects are the dialog boxes that pop out and send the user a simple message. But, why does this class definition have the UI in front? Why not use the more understandable word Alert for a name of the class definition? Even odder you will find that there are many classes like this such as UITableView, UITableViewController, UIView, UIViewController, UIButton and so on. All of these classes are part of the framework called UIKit.
The UI and other two letter prefixes are there to help us distinguish classes that belong to a certain framework. So, all the UI classes belong to UIKit. It is a matter of convention to either make this prefix a hint about what the framework is supposed to do or to use the first two letters of the company or person that created the framework. In UIKit here the UI stands for User Interface which indicates to us that all the classes in UIKit with be responsible for user interface components like buttons and other things that appear on the screen.
NS is the prefix used for all the Foundation classes. This prefix is not as obvious, but most people believe that this refers to the company that originally created Foundation (NextStep). In the examples below you will see that the Foundation classes that we are using all have the NS prefix.
NSObject
One of the most important classes in Foundation is called NSObject. NSObject is a class that defines generally what an object is in Objective-C. nNSObject includes code that is useful for any object that we will use in programming. For this reason, most other classes are in an inheritance relationship with NSObject. NSObject is considered the root (or first) class.
One of the things that NSObject does is provide methods to allocate memory for objects and set the initial properties for objects. Most classes that inherit from NSObject use these methods to instantiate objects. NSObject also has a method called description that returns a text description that describes the class.
Sending Messages
In Objective-C, we get things done by sending messages to classes and objects. When you want something to happen you must send a message to the object or class responsible for the action.
Sending messages to objects is a bit like calling functions in procedural programming. When you send a message to an object or class the message will match a method definition (which is coded in a similar way to a function) that is part of the class. You will find out how to code your own methods in the next chapter. Messages can have parameters and they may perform some action or return a value. You can send messages to classes or to objects. You can send a message to a class at any time but you can only send messages to objects after the object has been instantiated.
Sending Messages To Classes
You can send a message to a class by enclosing the class definition name in square brackets and writing in the name of the message that you would like to send. For example, if I wanted to send a message to the NSObject class asking for a description of NSObject I would send the description message to NSObject:
[NSObject description];
In the message about we did not do anything with the return value (the description message returns a string). A more practical way to use the description message is by writing its output to the log like this:
NSLog(@"%@", [NSObject description]);
This would print out NSObject’s description to the log which is simply NSObject. Notice too that the function, NSLog, that we have been using has the NS prefix which marks NSLog as part of Foundation.
The messages that you send to classes are defined in the class as class methods. Class methods are methods that are only used with the class itself. You can find out what class methods are available to you by looking up the class definition in the documentation that Apple provides with iOS SDK. Each class has a special section that lists all the class methods under the title Class Methods.
Sending Messages To Objects
You can also send messages to objects. The only difference here is that you must have an object in place that has already been instantiated. Messages sent to objects correspond to what are called instance methods defined in the class definition. You can find out what instance methods are available by looking up the class in the Apple documentation and checking under the heading Instance Methods.
You will see some real examples of messages sent to objects below. But, they will all follow this pattern, which looks like the pattern we used to send messages to classes:
[object doSomething];
You can send messages to objects and classes that have parameters but before I show you how to do that I want to introduce you to some more Foundation classes so I can give you more concrete examples. First though, we need to see how to instantiate objects.
How To Create Objects (Instantiation)
To create objects we follow a process that starts off a bit like declaring variables in procedural programming. To jog your memory, to declare an integer variable you would simply type this:
int myNumber;
The first step to creating an object looks very similar, but for objects we do not use the primitives type definitions like int or float. Objects require a class definition in place of the type. Objects also require us to use the * in front of the object’s variable name. Here is an example of how to declare an object using the NSObject class definition:
NSObject *object1;
Next we need to do two things: instantiate an instance of the class (the object) and initialize the object. To instantiate an instance of a class we send the alloc message to the class. This will allocate memory for the object and return the object, which we can then assign to our object variable.
object1 = [NSObject alloc];
The next part of the process is to initialize the new object. NSObject gives us the init instance method to do this for us, but other others will have other initialization methods. By convention, initialization methods begin with init.
You send the init message and assign the return value from init to the object1 variable.
object1 = [object1 init];
That is all there is to instantiating an object in Objective-C. But, there is one more thing. Even though I showed you how to do this in three steps with three different lines of code, most programmers will do this all in one line of code by declaring the object and then using nested messages. Nested messages are messages that are enclosed in other messages. So usually you will see objects declared, instantiated and initialized all on the same line like this:
NSObject *object1 = [[NSObject alloc] init];
In the line of code above the [NSObject alloc] message is nested in inside the init message. How it works is that the innermost message gets sent first to do its thing and then the next nested message will be sent. So above you first send [NSObject alloc] which returns an instance of NSObject. Next we send the init message to the object that was just returned.
Creating Objects Without Alloc and Init
There is another way to create objects, and that is done through what I like to call convenience methods. These methods also return objects like the alloc and init methods, but they do things a little bit differently in the background.
Here is an example of a convenience method that returns an NSString object.
NSString *aString = [NSString stringWithString:@"My New String"];
NSString is a commonly used and important class that we will cover next. You can see from the code above that we are still creating an object, but we are not using alloc to allocate memory for the object nor are we using an init message to initialize the object. This is how you can tell that you are using a convenience method to create an object.
NSString
A string is a list of characters like “See spot run”. If you have working with strings using what you know of programming so far you have probably been a bit frustrated. C has support for individual characters with the char primitive type but if you need to use more than one letter you are would be in for more work if it wasn’t for NSString.
NSString is used very often in iOS apps so it is a great class to get to know well. For the first example we are going to create an object using the NSString class definition. Then we are going to use this object as a parameter in the UIAlert object alert to make alert present a different string to the user.
The easiest way to use NSString is to declare a NSString object and assign it a string value on the same line. Let’s create a NSString for “See spot run”:
NSString *spotString = [NSString stringWithString:@"See spot run"];
The first part of this line of code is NSString *spotString. This is how we declare our NSString object here called spotString. Since this is an object declaration we need to remember to use the * before the object name. In the next part we use the assignment operator to assign the string “See Spot Run” to the spotString object variable using the NSString convenience method stringWithString:.
The @ symbol here is a called a compiler directive. Compiler directives are used to let the compiler know that there is something special about the code following the directive. Here the @ indicates that the text in the parenthesis is a NSString object and not a regular C string. The code we are using here is a shorthand version of a convenience method that we covered earlier, stringWithString:.
Once you have a NSString object you may use it throughout your program when you need a string. Since we want to use our string immediately we can just use the convenience method to create the string object.
Here is an example of how you could use the string object. If we want our alert object to say “See spot run” instead of “Hello World” we can use spotString as a parameter in place of the “Hello World” string that we already have in there.
Before
-(BOOL)application:(UIApplication *)application didFinishLaunchingWithOptions:(NSDictionary *)launchOptions {

     UIAlertView *alert = [[UIAlertView alloc] initWithTitle:@"Alert View"
                                                     message:@"Hello World"
                                                    delegate:self
                                           cancelButtonTitle: @"Ok"
                                           otherButtonTitles:nil];
     [alert show];

     [window makeKeyAndVisible];

     return YES;
}
After
-(BOOL)application:(UIApplication *)application didFinishLaunchingWithOptions:(NSDictionary *)launchOptions {

     NSString *spotString = @"See spot run";

     UIAlertView *alert = [[UIAlertView alloc] initWithTitle:@"Alert View"
                                                     message:spotString
                                                    delegate:self
                                           cancelButtonTitle: @"Ok"
                                           otherButtonTitles:nil];
     [alert show];

     [window makeKeyAndVisible];

     return YES;
}
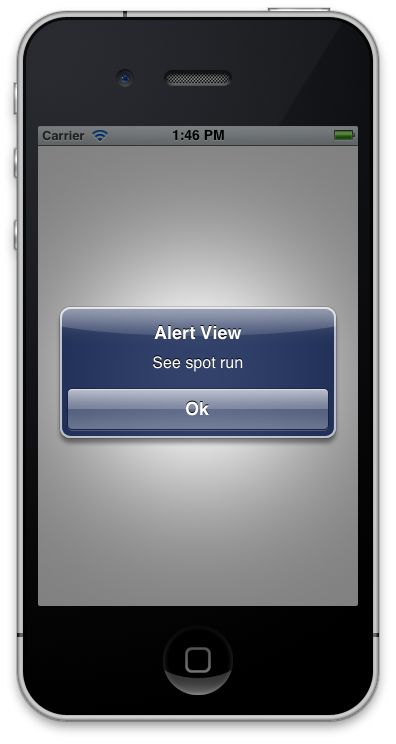
Now when you use the code to run your app you will see this instead of the Hello World message:

Figure 7.1: spotString object presented in alert
Since spotString is an object created from the NSString class definition you can do a lot more with spotString than simply use it in other objects. Remember that objects in object oriented programming have attributes and behaviors. We usually call attributes properties when we talk about them in the context of code. NSString objects have two properties: description and length.
Description is the characters that make up the string. To use this property you can use dot notation, spotString.length or as a shortcut you can simply use the object itself like you did in the example above. The length property is an integer that tells us how long the string is. So as an example here is how you would write out the length of spotString to the console screen:
NSLog(@"spotString.length = %i", spotString.length);
NSString objects also have some other methods that are very useful. For instance, if you would like see in your string in all capital letters you could use the uppercaseString method:.
NSLog(@"spotString all caps = %@", [spotString uppercaseString]);
The line above would print out this message to the console:
spotString all caps = SEE SPOT RUN
Similar methods exist to display lowercase letters, to compare strings, search for substrings and even to capitalize the first letter in the string.
Hands On Time
Foundation is a very rich framework so I am going to spend some more time showing you what you can do with Foundation classes in the next chapter. But, for now start getting a feel for how to use object oriented programming with Foundation by experimenting with the NSString class.
Change the Hello World code to have the alert object display an all lowercase version of your “Hello World” message. To do this you must create your own NSString object to use in the alert.
For a challenge, see if you can figure out how to use your NSString object with the string “Hello World” to display only the word “Hello”. Check out the documentation for some methods that will help you do this. The easiest way to check out the documentation for NSString is to hold down the command key and click on the word NSString while you are in XCode. You may also simply look up NSString on the Apple Developer website. While you are there take a look at all the features included with NSString.
Hint: the method that you are looking for as the word substring in it.